


1. Introduction
When using a sampled ensemble, one of the issues in mixing is the panning position or localization. In a real ensemble recording, each instrument sits in a different location, and when all the instruments play together, this enables them to both blend and yet remain distinct. It allows us to “focus” our hearing on a particular instrument, and it creates a wide and expansive stereo field.
Localization is the human ability to detect the spatial position of a sound, and it comes from left-right volume differences, left-right arrival-time differences, and frequency response changes due to the HRTF or head-related transfer function. (The way sound changes due to the shape of our ears and head)
Distance Cues are artifacts in the sound that tell us a sound is near or far. Relative volume, frequency response changes, and most importantly, reverb and reflected sound help us detect the distance of a sound source.
Getting these things right in a “real” recording is hard enough; microphone arrangements and patterns, room acoustics, and the setup of the ensemble are all part of this, as well as the skill of the mixing engineer. With sampled instruments, it’s even more difficult, since now the element of “realism” is in question.
2. Virtual Stage
There are a couple of ways that a sampled instrument is typically “placed” in a virtual stage with a realistic sense of localization and distance, each of which has some disadvantages:
1. Artificial panning and reverb: While flexible, volume-only panning (the kind you get when you move the panpot on a mixer) doesn’t replicate the arrival-time and frequency response changes inherent in true localization. Sounds from the left should arrive at the left microphone earlier, not just louder. Also, the patterns of reflectivity vary with location. The result is a less-than realistic ensemble, with a lack of “air” and space.
2. Embedded panning: Here, the samples include the panning and distance information. Sometimes they are in a separate layer of samples. While realistic, there is no way to change this localization, so the instrument “sits” in one spot only. Because of this, there is no way to vary the type or pattern of reflectivity, Also, this multi-mic approach requires several sample layers to play for every note, eating up polyphonic voices. For orchestra, where there is a “traditional” layout, this might work, but for contemporary music, more flexibility is needed, while keeping the authenticity.
More importantly, note-transitions and legato playing are not workable with reverb built into the samples, since the reflectivity would necessarily get “cut off” under certain circumstances.
3. Convolution and the C.L.A.M.S Approach
Convolution is a mathematically complex process whereby an “impulse response” (IR) is used to re-create a set of reflections and frequency response changes. Each sample of a waveform is now spread through time using the IR. All the details of the recording are embedded in each impulse, and can be superimposed on a set of “dry” samples. Kontakt has a very efficient and flexible convolution engine.
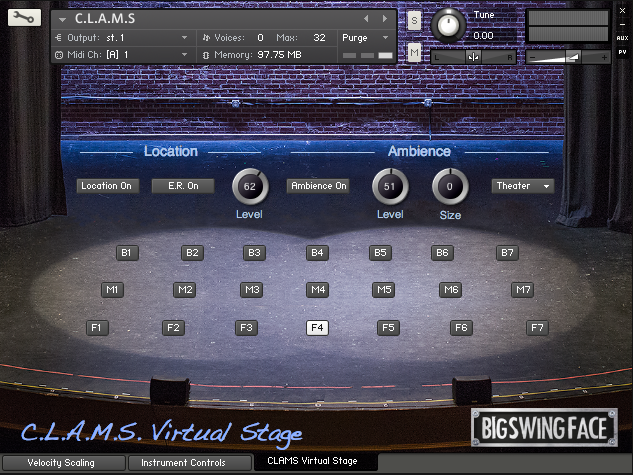
The C.L.A.M.S VIrtual Stage (Convolution, Location and Ambience Modeling System) is a set of impulse responses reflecting (pun intended) each different location on the stage. They were recorded in a real theater, in the exact stage locations seen in the interface. Careful editing and processing of these impulses as well as acoustical treatments were used to make these as “clean” and accurate as possible.
Each IR was divided into 3 different segments, and programmed into the interface:
1. Location: This is the earliest part of the IR, consisting of the direct signal, and the earliest reflections, along with any changes in frequency response. These contain the arrival-time and volume cues that place the instrument in a certain spot.
2. Early Reflections: (ER) These are the reflections of the immediate area around the stage, found in the first 30 milliseconds or so. These give us a sense of the room, and more importantly, tell us how far away this source is. As an example, the front-center and rear-center locations are not too different in location cues, but the rear-center has louder and different early reflections.
3. Ambience*: This is the actual “reverb” of the space. It arrives after the location and early reflections. This gives us a true sense of the size of the room. Furthermore, since it has less to do with stage location and distance, we can “mix and match” different ambience IR recordings without changing the stage layout. The “Theater” setting is the reverb that followed the earlier impulses.
*Not to be confused with “Ambiance,” which can be found in a cozy French restaurant.
4. Using the Interface
Each element of the system can be turned on separately; turning them off will save processor load.
The Location button substitutes the “located” sound for the dry sound of the instrument. When on, the location IR selected by the stage buttons will be loaded. There are 21 locations in three rows to choose from. Only a single stage button can be selected at a time. Try switching locations while playing to hear the sound move around the stereo field. Due to the loading process, there may be a brief drop-out while switching locations.
The E.R. On button turns on early reflection patterns for each stage location. These will enhance the “depth” of the soundstage; you will notice more distinction between rows, and more “space.” It is possible to use E.R. with Location turned off ; this won’t give as strong of a position cue, but might be good for centered instruments or solos.
E.R. Level controls the volume of the early reflections. Typically middle settings will work best, unless you want a “splashy” sound. Turning E.R. all the way down wastes processor load; in this case it’s better to turn it off to allow more polyphony.
Ambience On turns on the reverb impulse. The selection of impulse is controlled by the Type menu on the far right. Ambience Level controls the amount of reverb; once again, if you don’t want any reverb, rather than turning it down, turn it off using the switch to save processor load.
The Size knob scales the reverb impulse length; set to center or “0,” it is at the as-recorded length. Since this doesn’t influence location, feel free to experiment with length to fit your mix.
5. Processor Management
In convolution, processor load is always an issue, due to the computation-intensive nature of the process. Processor load is also proportional to the length of the impulses; this is one reason why we separated the reverb from the location and E.R. impulses. Since they are short in duration, they won’t use a lot of processor cycles.
If you build an ensemble, you will need C.L.A.M.S for each instrument to build a full stage layout. Using ambience for every instrument would probably be a redundant, since they all share the same reverb sound. In this case, it makes sense to use only Location and E.R. for each instrument, and then use a convolution reverb on the output of the Kontakt plug-in. You can do this within Kontakt by loading reverb either on the output channel or by using a send. (press the “output” button on the top of the Kontakt panel to reveal this virtual mixer) You could also use the reverb plug-in of your choice in your host program.
Pingback: BSF Tenor Trombone Press Release – BigSwingFace